This article is the most comprehensive step by step guide for beginners about creating path in photoshop.
A clipping path in Adobe Photoshop is a vector path that determines which parts of an image will be visible and which will be clipped. It essentially acts as an outline you draw around an object in your image.
Photoshop image clipping is the most effective way you can use to remove objects from their backgrounds, edit background to transparent. white or any color you like.
Despite modern, faster AI/automated background removal tools, the clipping path remains the industry standard for products with sharp, well-defined edges.
Let’s start.
Pro tips 1: Cut out image is easy but creating accurate path is so difficult. Lots of practices is needed to do it perfectly. Moreover, you also need assistance from experts who can guide you and solve issues. Otherwise, it may brings disastrous results. The best way to get the 100% accurate path is to hire professional clipping path service provider. However, if you still want to learn, then follow below.
How to Create Clipping path in Photoshop
The most professional way to create a clipping path in Photoshop is by using the Pen Tool to trace the subject, then saving that vector outline as a path, and finally converting it into a clipping path. Follow this steps to create your first clipping path.
In this tutorial, we are using the latest photoshop cc. However, you can use any photoshop versions i.e. 2020, 2021 or older version PS 3.0 to follow along this photo editing tutorials.
Step 1: Open an image in Photoshop

Launch the Photoshop program. Then from the file menu, upload the selected image in the program to start the process. You may drag the image on the editing panel to create a mask in photoshop. Or from the file menu, select open to upload an image in the canvas.
Pro Tip 2: If you are totally new in Photoshop, you should use objects with simple linear shapes, such as ruler, smartphones, and laptops, to create a path around your product images.
Step 2: Create Duplicate Layer

After opening the image in photoshop, you have to do some basic tasks. Open layer panel.
- Click on Window in the menu bar at the top of the screen, then select Layers from the dropdown menu.
- If the Layers panel is still missing, you can reset your workspace. Go to Window > Workspace and choose Essentials > Reset Essentials.
The steps you will do here –
- Unlock layer,
- create a new layer, and
- zoom in on the image to adequately see the edge of the image.
Utilize the path panel to manage your clipping masks efficiently.
Step 3: Select the pen tool

So, select the pen tool from the toolbar on the left side of the software or press the P key on your keyboard.
Step 4: Select a New Path

Select a new path from the toolset. If you don’t see it on the right side, you can find it in the windows section at the top bar.
Step 5: Start drawing the exact shape of the image.

Everything is perfect. Now, start drawing the exact shape of the image. Depending on the image’s complexity, you may take time to complete the process.
With pen tool selected, create the first point on the image and then click-drag, click-drag, click-drag …… until you have reached the first point.
Pro Tip 3: Now drawing patch on curve requires patience. You can use this tool to practice drawing different carved path.

Step 6: Save Path

After finishing the outlining, go to the layer panel and select the path tab. While selecting the path tab, you see three dot lines on the right side. Click on it, and a dialog box will open in front of you. From there, click on the save path.
You will ask to give a name of your path. Give a name and press ok. After that, go to clipping path menu from the same drop-down menu.
A dialog box will open in front of various clipping path settings. Make sure your path is selected for making any changes in settings.
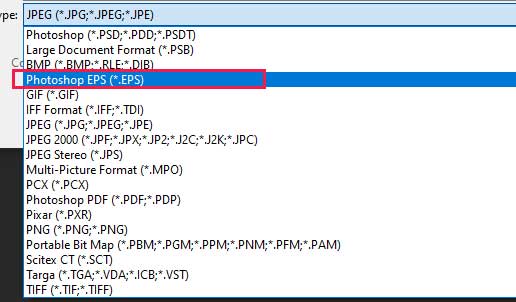
Step 7: Select Photoshop EPS file format from the file menu.
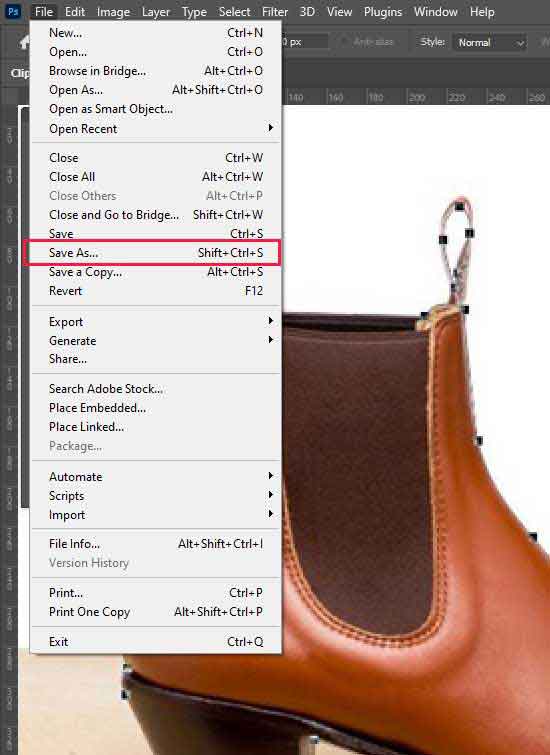
In this stage, go to the main file menu of the software and click the save as button. From here, select photoshop EPS file type. Note: this will save the image with clipping path in it.

To save the work path, click on Go to File > Save As… on the top menu or use SHIFT+CTRL+S.

Choose Format: Select the Photoshop EPS or TIFF format.
Then Click OK.
Pro tip 4: If saving as EPS, in the EPS Options dialog, ensure the Include Halftone Screen and Include Transfer Function boxes are unchecked. Make sure the Include Clipping Path option is set to On.
Step 8: Add layer mask from layer panel

Go to the layer panel and double-click on the add layer mask icon. It will save the selected path as a layer mask, and everything outside the path will be transparent. Finally, click on save as, to save a new file.
How to “Remove” the Background Using a Clipping Path
- Double-click the Background Layer in the Layers panel to turn it into a regular layer (e.g., “Layer 0”)
- Ctrl+Click (Win) or Cmd+Click (Mac) on the thumbnail of your saved clipping path.
- Press Shift+Ctrl+I (Win) / Shift+Cmd+I (Mac) or go to Select >Inverse. This selects the background area.
- Press the Delete or Backspace key. The background area will become transparent.
- Go to File >Save a Copy and select PNG or TIFF (formats that support transparency).
Conclusion
Creating clipping path isn’t so easy that described in here. You mayn’t get your desired results in your projects. For creating path perfectly, patience and practices is must. Sometimes you may need to spend hours after hours for a single projects. You may get often frustrated but don’t leave it if you seriously want to be path experts.
If you are a busy person, than it will be better to outsource it from others. There are lots of clipping path companies available in internet, you can pick anyone from them. If you are confused to select one, this guide may help you.
Have any questions, drop a comment below, and we will try to solve them. Help others learn to create clipping path in photoshop by sharing this article on social media.
Read our others clipping path related articles


