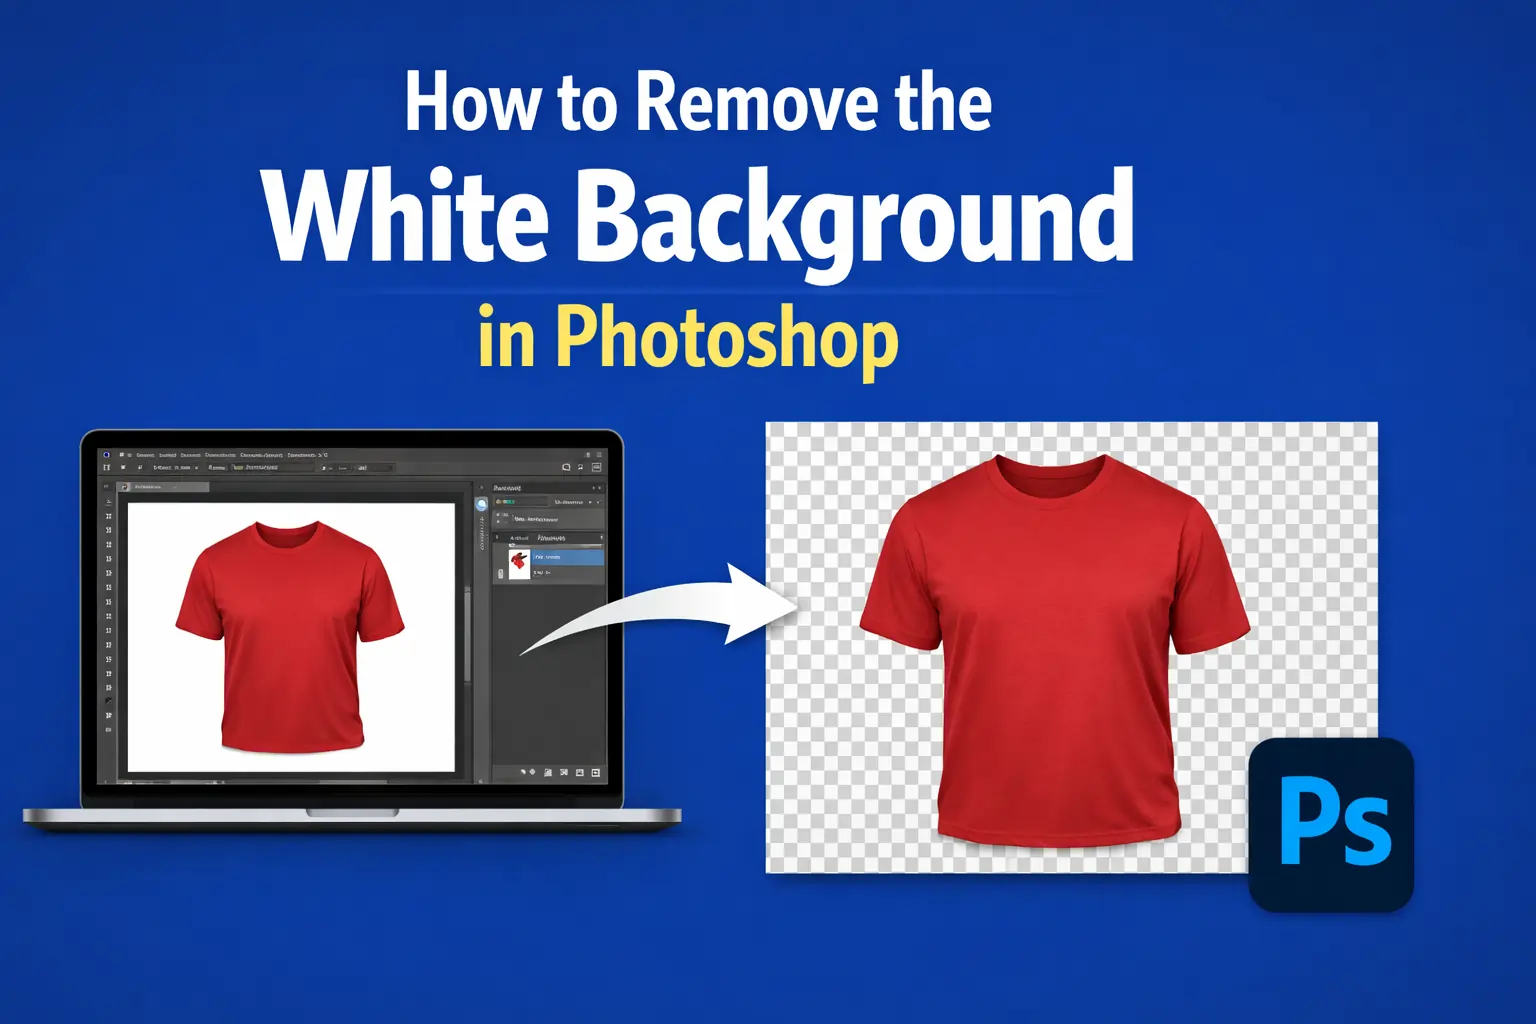
To remove the white background in Photoshop, first select your subject using the Quick Selection, Lasso, or Photoshop pen Tool or the Select Subject button in the Options bar. Then convert to selection, and once the “marching ants” appear, apply a Layer Mask to hide the white background while keeping your cutout sharp and professional.
In this article, we are going to explore the process of removing the white background in two of the most commonly used methods –
1. using the Photoshop “Remove Background” button to remove it in one click.
2. Use the pen tool to remove the white background professionally.
End goal, transparent 90%, 10% change the background.
Removing White Background in One Click in Photoshop
Here, we will learn the beginner-friendly method that we will use with Photoshop AI.
Method 1: Remove Background (Fastest & Best for Simple Photos)
Best for: People or objects on a clean white background
Photoshop version: CC 2020 or newer
Steps:
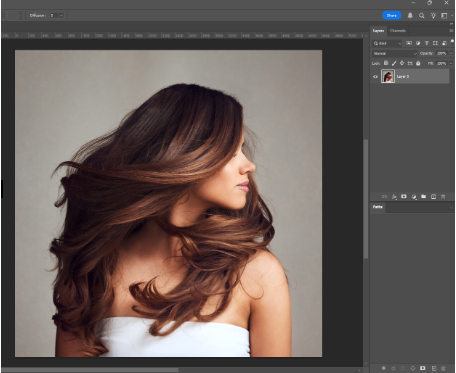
- Open your image in Photoshop.

- In the Layers panel, unlock the image layer if it’s locked
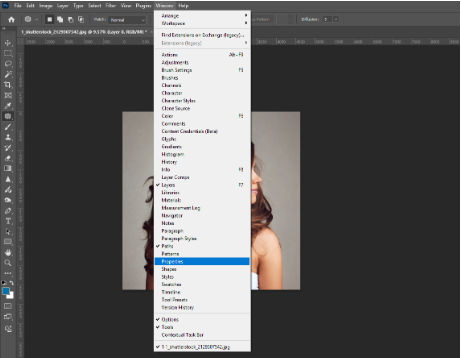
- Go to Window → Properties to open the Properties panel.
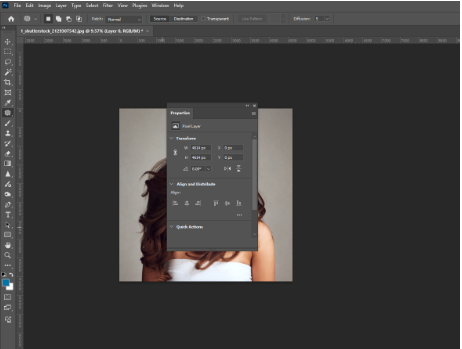
- With the image layer selected, find Quick Actions.
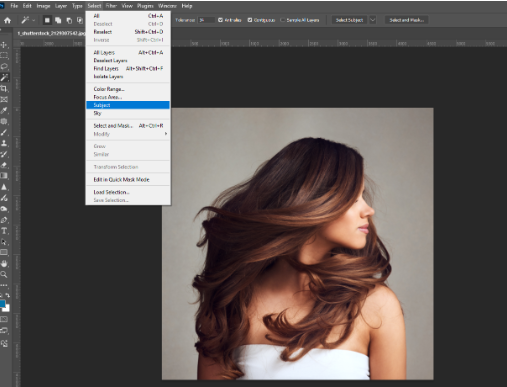
- Click Remove Background.
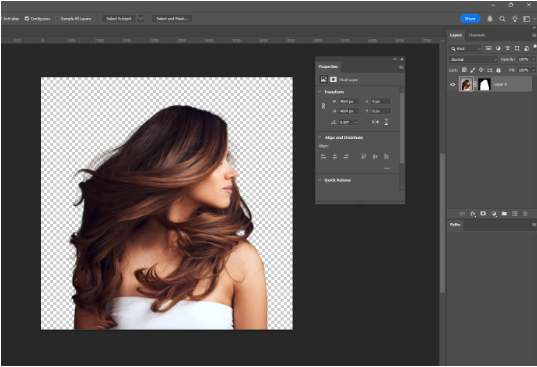
Result:
- Photoshop automatically selects the subject.
- A layer mask is created.
- The white background is removed in one click.
Method 2: Magic Wand Tool (Best for Logos & Flat Graphics)
Best for: Logos, icons, graphics with solid white backgrounds
Steps:
- Select the Magic Wand Tool (nested under the Quick Selection Tool).
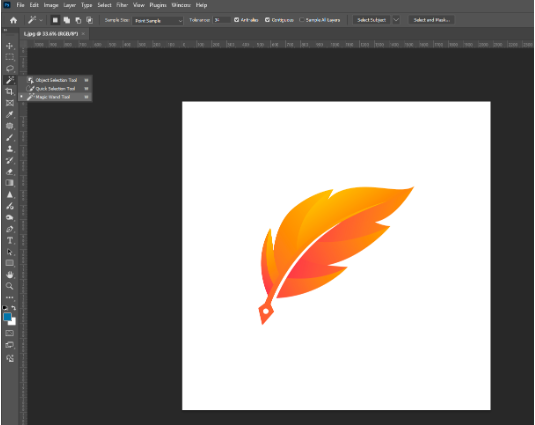
- In the top options bar:
- Sample Size: Point Sample
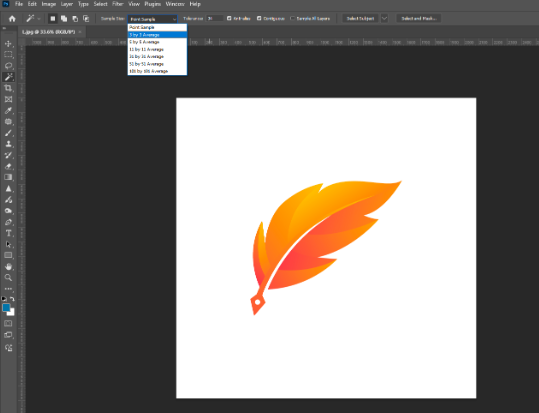
- Tolerance:
- Below 20 if your logo contains white or gray
- Any value if it doesn’t
- Check Anti-alias
- Check Contiguous

- Click on the white background.
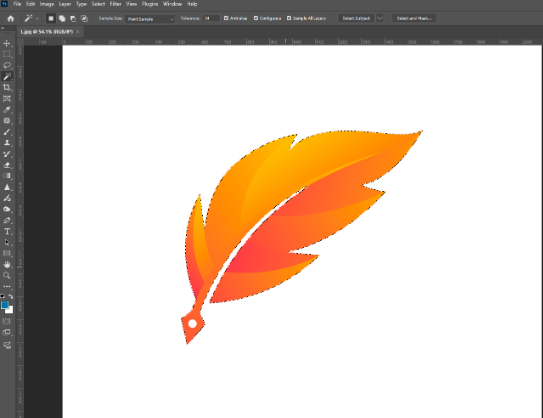
- Click the Add Layer Mask button.
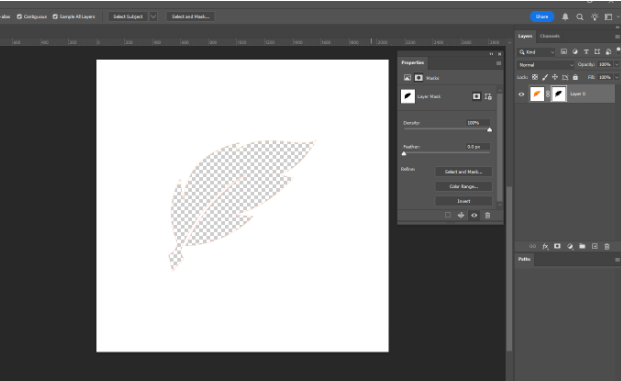
- Press Ctrl/Cmd + I to invert the mask.
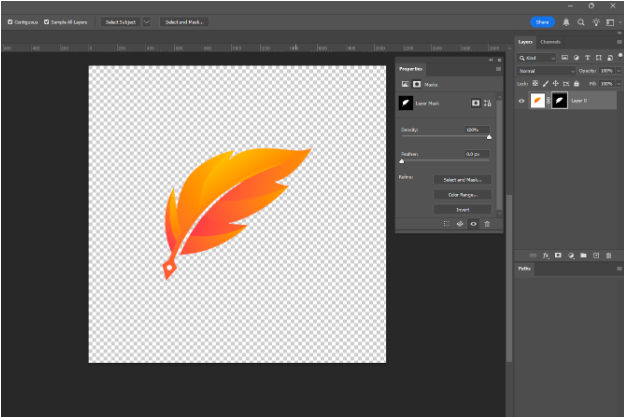
Result:
- The background is removed non-destructively.
- Your logo remains clean and editable.
Method 3: Magic Eraser Tool (Quick but Destructive)
Best for: Graphics only (not people)
Warning: This permanently deletes pixels
Steps:
- Select the Magic Eraser Tool (under the Eraser Tool).
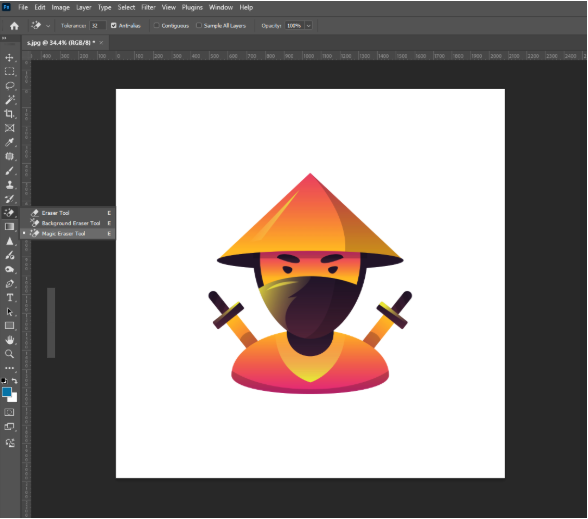
- In the options bar:
- Check Contiguous
- Adjust Tolerance (lower values = more precision).
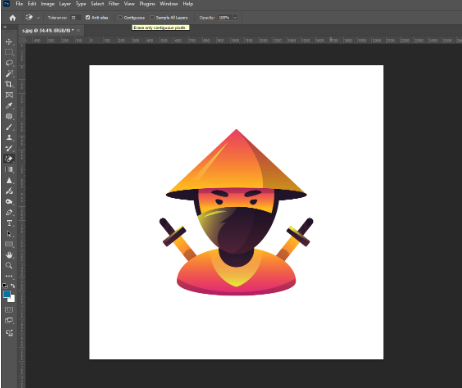
- Click on the white background.
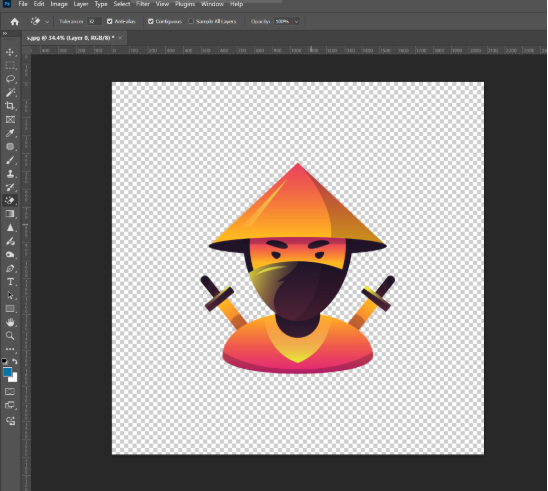
Important Tips:
- If unwanted areas are erased, lower the tolerance.
- Contiguous prevents Photoshop from deleting similar colors inside the subject.
Method 4: Channels Method (Best for Hair & Complex Edges)
Best for: Hair, fur, transparent or detailed edges
Most accurate method
Step 1: Find the Best Channel
- Open the Channels panel (Window → Channels).
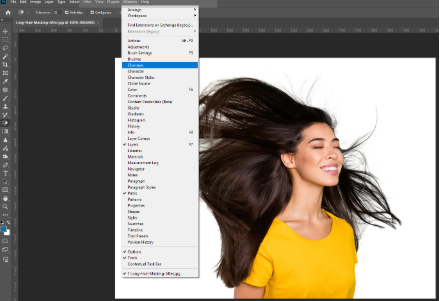
- Click through Red, Green, and Blue channels.
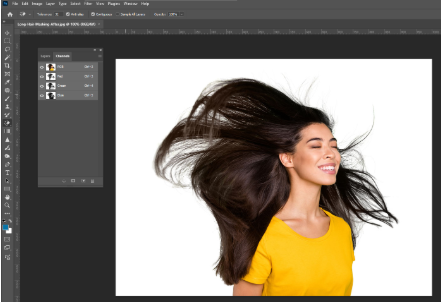
- Identify the channel with the most contrast between subject and background.

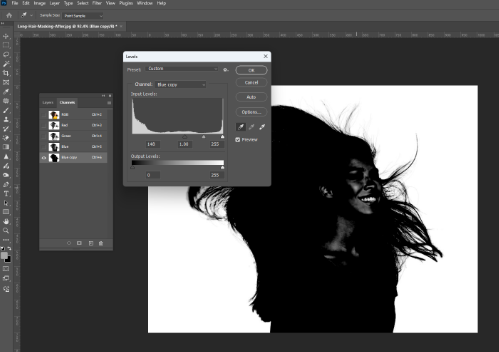
Step 2: Create a High-Contrast Mask
- Duplicate the most contrasty channel.

- Press Ctrl/Cmd + L (Levels).
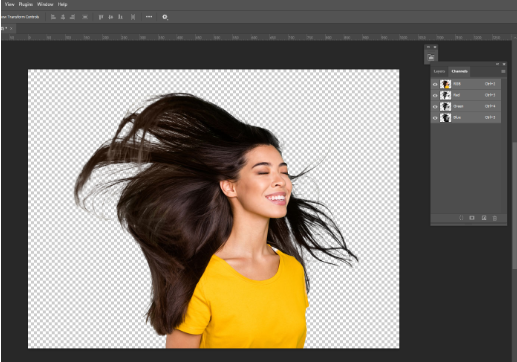
- Increase contrast
- Darken the subject
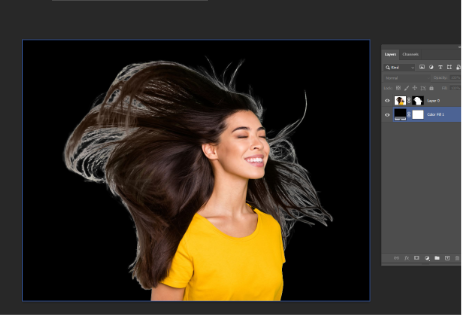
- Brighten the background
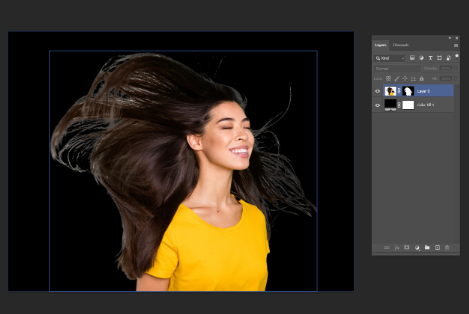
- Don’t overdo it—retain hair detail.
Step 3: Refine with Brush (Overlay Mode)
- Select the Brush Tool.

- Set brush mode to Overlay.
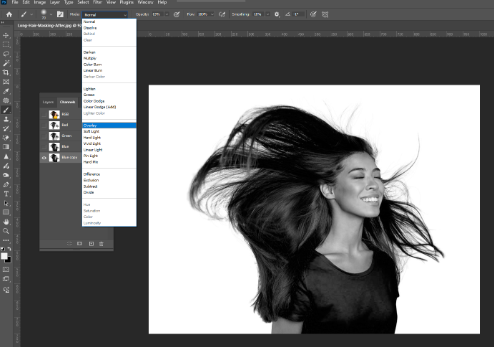
- Paint:
- Black over the subject and hair
- White over the background
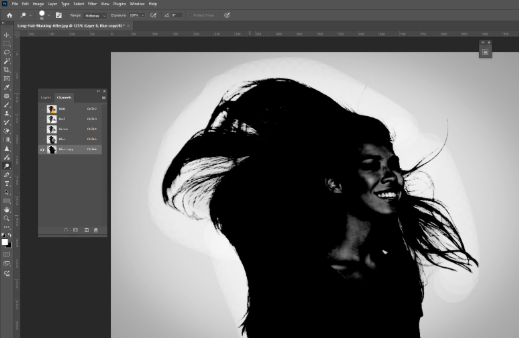
- Switch to Normal mode to clean up problem areas.

Step 4: Create the Selection
- Hold Ctrl/Cmd and click the channel thumbnail

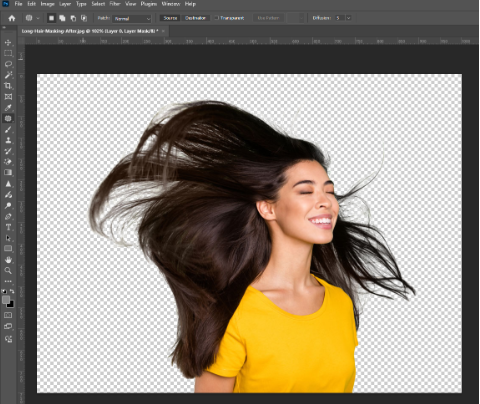
- Go back to the Layers panel
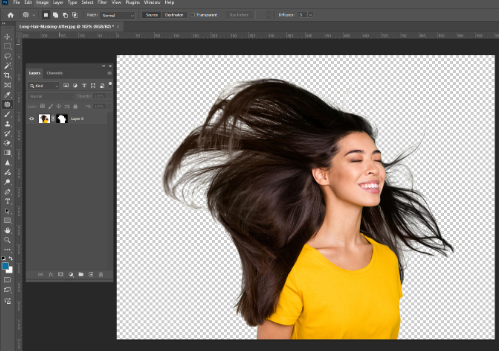
- Add a Layer Mask.

Professionally Remove White Background With Pen Tool
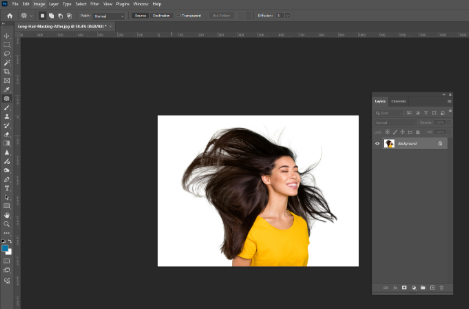
1) Open your image + unlock the background

- Open the photo in Photoshop.
- In the Layers panel:
- If you don’t see Layers: Window → Layer

- Double-click Background layer → press OK (this unlocks it so transparency is possible).
2) Zoom + navigate efficiently
- Zoom in/out: Alt + mouse wheel (or mouse wheel if your settings allow).
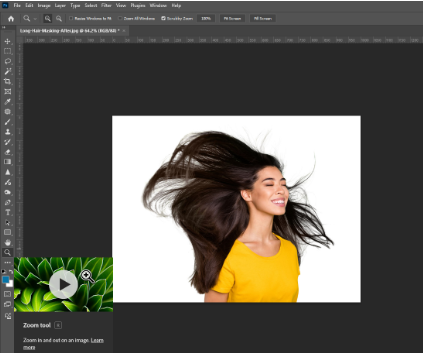
- Pan around while working: hold Spacebar and drag.
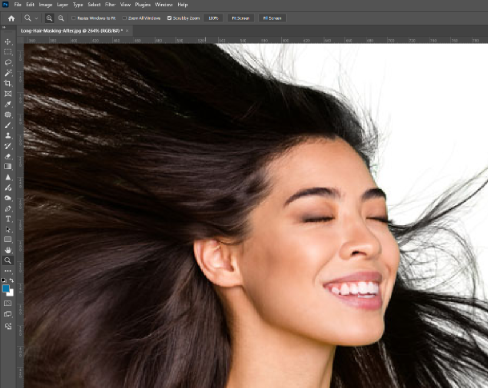
These two shortcuts make Pen Tool work way faster.
3) Cut the subject out using the Pen Tool (make a path)
- Select the Pen Tool (P).

- Start on an easy corner/edge (the transcript suggests starting in a “corner” like near the neck).
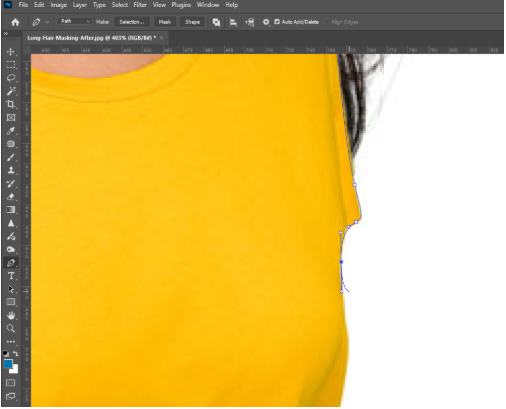
- Click once to place the first anchor point.
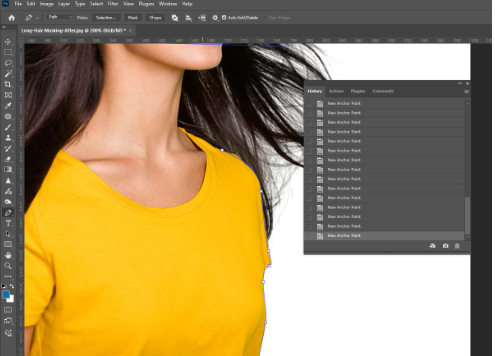
- For curves:
- Click + hold + drag to pull out handles (this creates a curved segment).
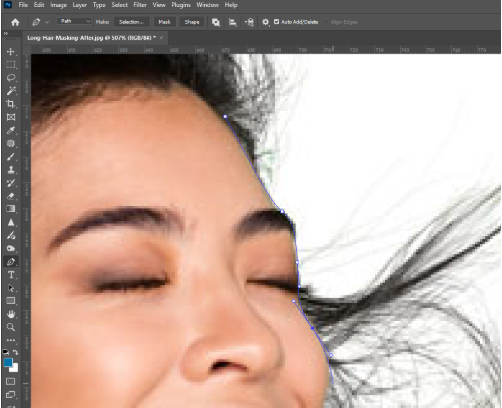
- Place the next point and drag again to follow the edge.
- Key idea: the curve continues in the direction of your handle—if you drag too far, the next curve can “loop.” If that happens: undo with Ctrl + Z or step back in Window → History.
Tip for hair: don’t try to trace every hair perfectly with the Pen Tool. Make a clean outline that slightly simplifies hair, then refine later.
4) Fix mistakes by editing anchor points
If your path misses an area or you want to improve a curve:
- Click and hold the Pen Tool icon to access:
- Add Anchor Point Tool: add a point where you need more control
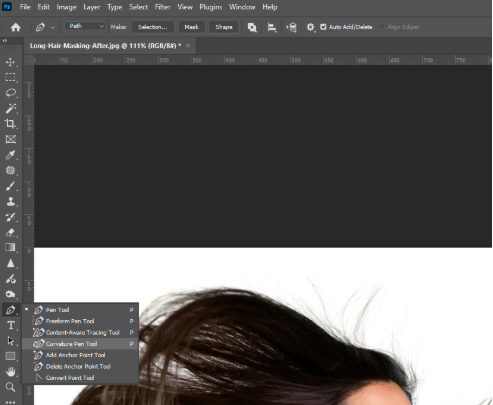
- Delete Anchor Point Tool: remove extra points to smooth the path
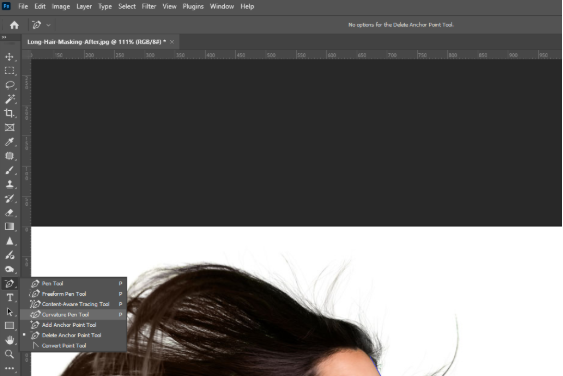
- Drag points/handles to reshape the curve.
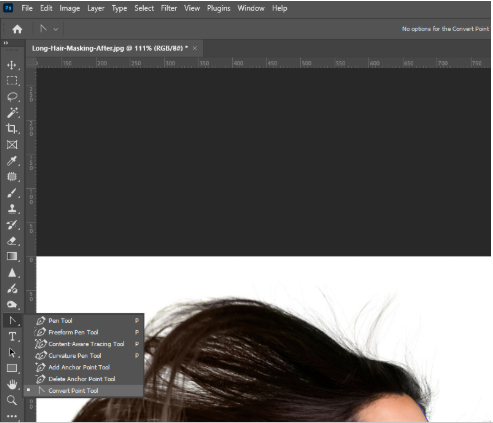
Goal: a smooth, accurate outline without too many points.
5) Close the path
When you return to your start point, you’ll see a small circle near the Pen cursor—click to close the path.
6) Convert the path to a selection
- Open the Paths panel:
- Window → Paths
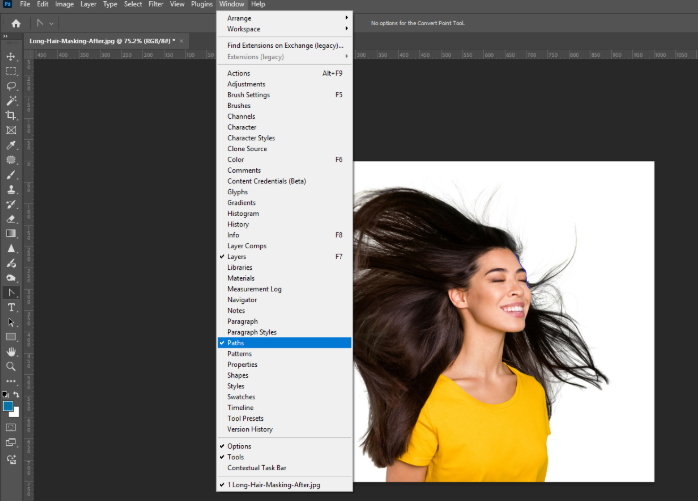
- Make a selection:
- Ctrl + click the path thumbnail
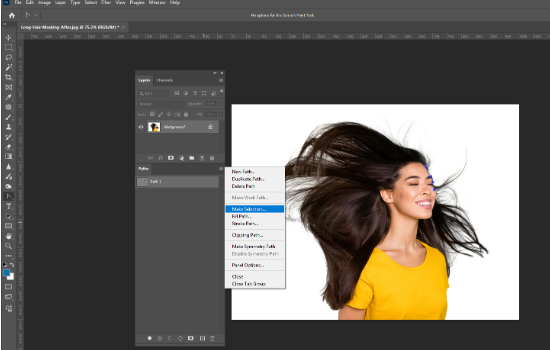
(or use the panel menu → “Make Selection” Now you have marching ants (a selection).
7) Refine edges using Quick Mask (especially hair)
- Enter Quick Mask:
- Press Q (or click the Quick Mask icon)

- You’ll see a red overlay.

- Use tools to refine edges (as described in transcript)
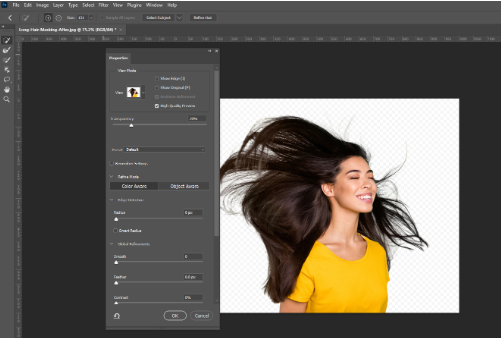
- Use a brush/smudge approach to nudge and soften hair edges.

- Toggle the view (the transcript mentions a “wavy” toggle / view mode) to inspect the mask in black/white if need

- Press Q again to exit Quick Mask

This step is your “cleanup pass” after the Pen Tool.
8) Duplicate the layer (backup), then delete the background
- Duplicate your cutout layer (so you can revert if needed).
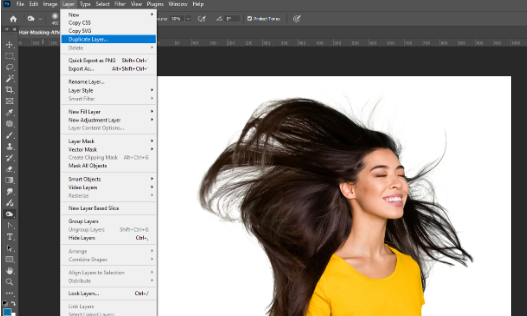
- With the selection still active:
- Go to Select → Inverse (so background is selected)
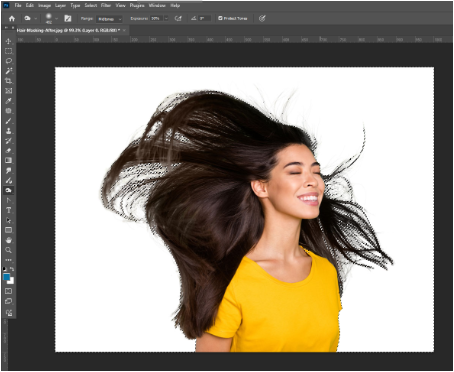
- Press Delete to remove the background.
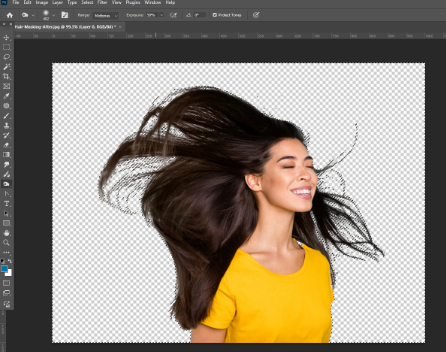
Now you should see transparency (checkerboard).
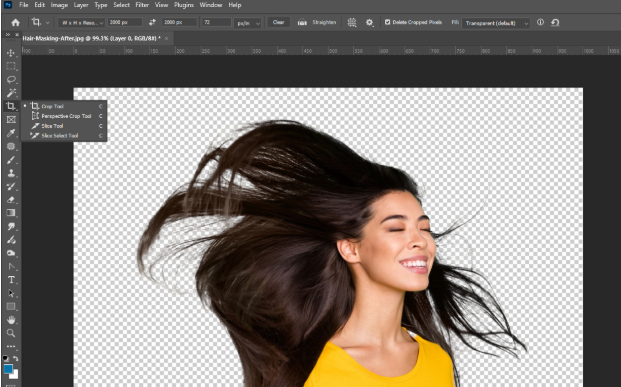
9) Crop for web use (optional)
If you’re making a profile image or want tighter framing:
- Use the Rectangular Marquee Tool to draw a box around the subject.
- Image → Crop
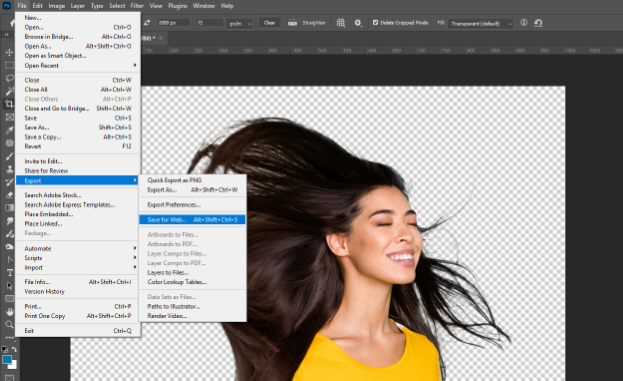
10) Export as a transparent PNG (web-ready)
- File → Export → Save for Web (Legacy)
- Choose PNG (not JPG).
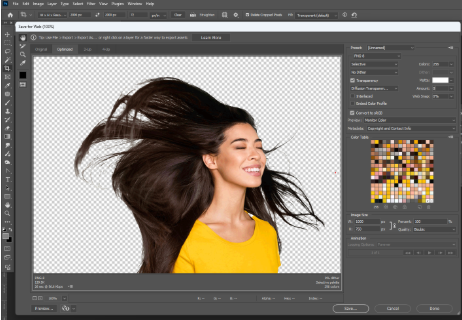
- Resize for web (the transcript example uses ~500px width).
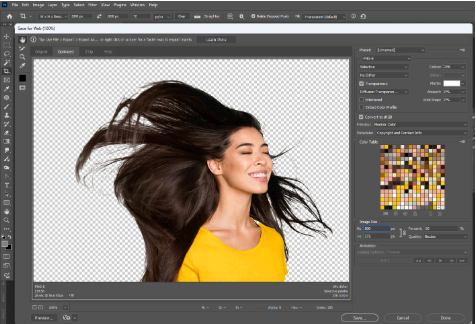
- Save.
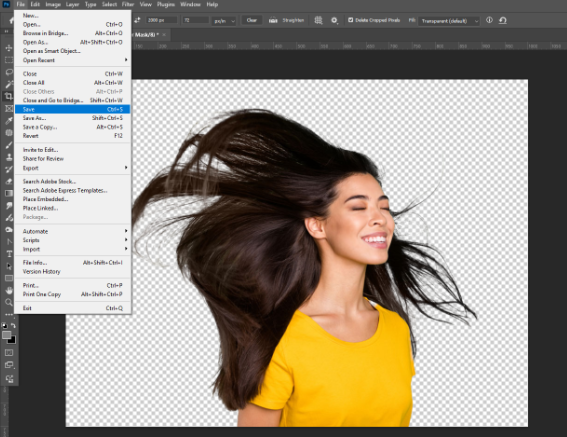
Note: PNGs with transparency can be larger files than JPG—resizing helps a lot.
Open the image in the photoshop. Use files>upload> or use ctrl+O
Picture
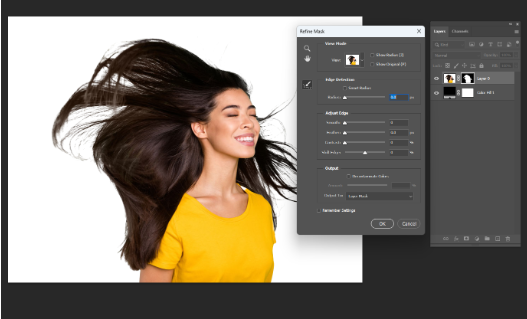
Refining the Edges
1. Use Select and Mask
Select and mask is the best tool for refining edges in Photoshop. It gives you better control over the selection. This tool keeps small details like hair and soft edges. It also removes hard and uneven outlines.
2. Turn On Smart Radius
Smart Radius on photoshop detects both hard and soft edges. It works well when an image has sharp clothing edges and soft hair at the same time. This setting improves edge accuracy automatically.
3. Use the Refine Edge Brush Tool
The Refine Edge Brush Tool is very useful for detailed areas. It recovers fine hair and fur. It also removes leftover white edges. Brush only along the edge for the best result.
4. Remove White Halos
White halos often appear after removing a white background. These halos become more visible on dark backgrounds. Using clean colors removes this problem and keeps the edges clean.
5. Adjust Smoothness Carefully
Smoothness reduces jagged edges. Use a small amount to avoid losing details. Too much smoothness can make the edges look fake.
6. Add a Small Feather
Feathering slightly softens the edge of the subject. This helps the image connect better with the background. Use feathering carefully, so the image does not look blurry.
7. Shift the Edge Inward
Shift Edge helps remove leftover background colors. Moving the edge slightly inward removes thin white outlines. This makes the cutout look more professional.
8. Check Edges on a Dark Background
Always check refined edges on a dark background. This makes it easier to see white outlines or rough edges. It helps ensure the subject looks good on any background.
9. Use a Layer Mask Output
Always output the result to a new layer with a layer mask. This keeps the editing non-destructive. You can fix mistakes easily later.
10. Avoid Eraser Tools
Do not use the Eraser Tool or Magic Eraser for edge refinement. These tools delete pixels permanently. Layer masks are safer and more professional.
Shaving The Images in a transparent or Different Background
Shaving an image means removing the original background and placing the subject on a transparent or new background. This process is commonly used for product images, portraits, and marketing visuals. Follow the steps below to do it correctly in Photoshop.
Step 1: Open the Image in Photoshop
Start by opening your image in Photoshop. Make sure the image layer is unlocked so you can edit it freely.
Step 2: Choose the Right Selection Method
Select the best tool based on your image type:
- Use Remove Background for simple images
- Use Magic Wand for logos or flat graphics
- Use Select Subject or Pen Tool for clean edges
- Use Channels for hair or complex details
This step creates the base selection of your subject.
Step 3: Create a Layer Mask
Once the subject is selected, add a Layer Mask. The mask hides the background instead of deleting it. This keeps the process non-destructive and allows future adjustments.
Step 4: Refine the Edges
Open Select and Mask and refine the edges carefully.
- Fix rough edges
- Remove white halos
- Improve hair and fine details
This step ensures the subject looks natural after shaving.
Step 5: Make the Background Transparent
After refining the mask, hide or delete the background layer. Your subject is now on a transparent background, ready for export or reuse.
Step 6: Place the Image on a New Background (Optional)
To add a different background:
- Create a new layer below the subject
- Add a solid color, gradient, or image background
- Adjust lighting and shadows if needed
This helps the subject blend naturally with the new background.
Step 7: Adjust Colors and Edges
Check for color spill from the old background. Use decontaminate colors or slight edge corrections to fix this. This step improves realism and professionalism.
Step 8: Export the Final Image
Choose the correct file format:
- PNG for transparent background
- JPEG for solid backgrounds
- PSD to keep layers editable
Set high quality settings before exporting.
Frequently Asked Questions
Is photoshop still the best software for background removal?
Yes, Photoshop is still the best software for background removal because it offers powerful AI tools, precise manual controls, advanced masking options, and non-destructive workflows suitable for professional-quality results.
What are the tools and techniques I can use for removing backgrounds?
Photoshop provides multiple background removal tools such as Remove Background (AI), Pen Tool, Lasso, Magic Wand, Channels, Clipping Path, Image Masking, and Select and Mask for different image types.
Which method do professional photographs use?
Professional photographers typically use the Pen Tool, Clipping Path, Image Masking, and Select and Mask techniques because these methods offer precise edges, clean hair details, and full manual control.
Conclusion
Best clipping path service helps achieve clean and accurate background removal by using professional Photoshop techniques like the Pen Tool, image masking, and edge refinement. These methods ensure sharp cutouts, smooth edges, and realistic results for products, portraits, and marketing images.
Read more Background Remove Related Atricle
How to Remove Background from Trees in Photoshop
Differences Between Hand-drawn Clipping Path Vs. Automatic Background Remover
How To Change Background Color In Photoshop 4 Simple Methods

