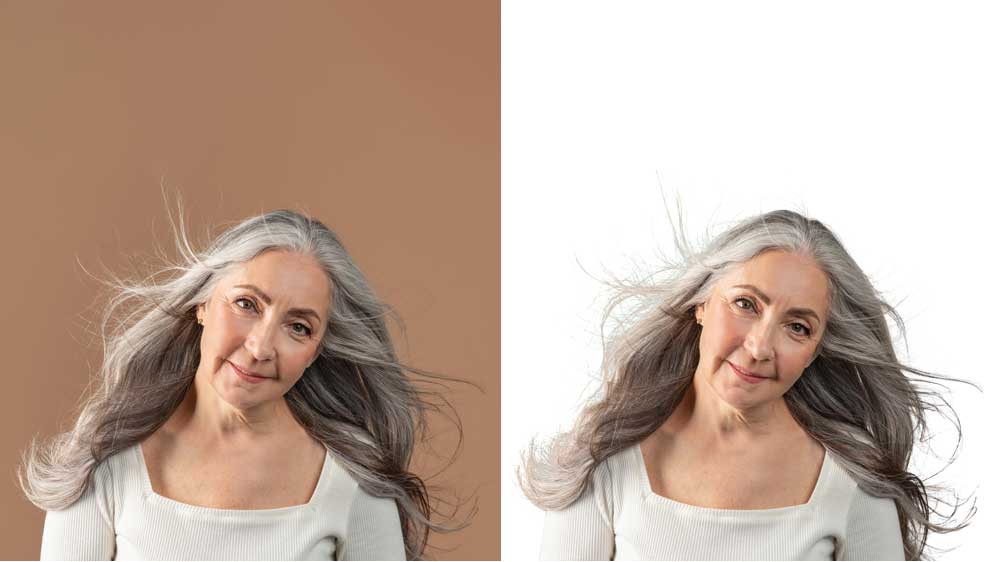
Imagine you’ve just captured a stunning photo of a model in a vibrant, bustling street. The lighting is perfect, the pose is flawless, and the outfit is a showstopper.
But there’s one problem:
The background is a chaotic mess, complete with distractions that detract from the focus of your image. This is where image masking becomes your superhero.
By carefully masking out unwanted areas, you can place your subject against a more perfect background, adjust colors, or create stunning compositions that captivate your audience.
In photo editing, image masking service is the unsung hero that brings clarity and precision to your visuals.
Whether you’re a professional photographer, a digital artist, or someone who loves to perfect their snapshots, mastering image masking can transform your work from ordinary to extraordinary.
Today, we will discuss everything you need to know about image masking.
So, let’s start
What is Image Masking?
Image masking is a background removal technique. It allows you to hide or reveal specific parts of an image precisely. At its core, masking involves creating a “mask” that hides or shows parts of an image. It gives you control over which areas are visible and which are obscured.
Difference between Image Masking and Clipping Path
While image masking and clipping path isolate parts of an image, they serve different purposes. Understanding when and how to use each technique can significantly enhance the quality and impact of your edited images.
Let’s find it.
- Image Masking:
Flexibility: Image masking is particularly effective for images with intricate details and complex backgrounds. It allows for a high degree of control over the visibility of various parts of an image.
Technique: Masking is typically done using brushes or selection tools in photo editing software. The result is a non-destructive layer that can be adjusted or refined anytime.
Use Cases: Ideal for photos with soft edges or semi-transparent elements, such as portraits, product images with intricate backgrounds, or any image where fine detail is crucial. - Clipping Path:
Precision: Photo clipping path service best suit images with well-defined, hard edges. This technique is highly effective for objects, like product shots or simple shapes
Technique: Editors use pen tool to draw a precise outline around the object. Once the path is defined, it creates a mask that removes the object from its background, leaving a clean edge.
Use Cases: Perfect for images with solid, defined edges where accuracy is critical, such as e-commerce product images, logos, or graphic design elements
Types of Image Masking
Image masking has some of methods. We will discuss some of important methods. Let’s go start now:
Alpha Channel Masking
Alpha Channel Masking uses an additional channel to define the transparency levels of an image. Each pixel has an associated alpha value in an image with an alpha channel that determines its opacity.
Use Cases:
- Complex Images: Ideal for images with intricate details, such as hair, smoke, or glass, where precise control over transparency is needed.
- Compositing: Useful in combining multiple images seamlessly, such as placing a model over a new background while preserving delicate details.
- Graphic Design: Often employed in creating layered designs where certain elements need to be partially transparent, like in web design or digital artwork.
Layer Masking
Layer Masking involves applying a mask directly to a layer in an image editing software. This mask allows you to hide or reveal parts of the layer without permanently altering the original image.
Use Cases:
- Selective Editing: Perfect for adjusting to specific parts of an image, such as brightening only the background or changing colors in certain areas.
- Non-Destructive Editing: Allows you to make changes and experiment with different edits without permanently altering the original layer, making it easier to adjust or revert changes.
- Photo Compositing: It helps blend multiple images. However, it allows for smooth transitions and adjustments between layers.
Clipping Masking
In clipping masking, the layer’s visibility is confined to the shape of the layer below it. The top layer is clipped to the boundaries of the bottom layer. So, the areas of the top layer that overlap with the bottom layer are visible.
Use Cases:
- Design Projects: Commonly used in graphic design to apply textures, patterns, or adjustments to specific shapes or areas defined by the bottom layer.
- Text Effects: Frequently employed to create text effects where an image or gradient is clipped to the shape of text or other design elements.
- Complex Shapes: Useful for isolating design elements or effects within complex shapes, such as masks for logos or intricate illustrations.
When You Should Use Image Masking
Image masking can be applied in various scenarios to achieve precise and visually appealing results. Let’s see when using image masking is a must.
- Images with intricate or cluttered backgrounds, such as a model in a busy street scene.
- In e-commerce or product photography, products must be presented against a clean, uniform background.
- Images with soft or semi-transparent edges.
- Multiple photos need to be blended seamlessly.
- Photographs that require cleaning up or repairing specific areas.
Tools and Software for Image Masking
Choosing the right tool for image masking depends on your specific needs and the complexity of your projects. Here are some tools you may use for masking.
In my case, I always prefer to use Adobe Photoshop. You may choose others depending on your choice.
- Adobe Photoshop: Adobe Photoshop is the industry standard for photo editing and graphic design. It offers a comprehensive suite of tools for image masking, making it highly versatile for simple and complex masking tasks.
- GIMP (GNU Image Manipulation Program): GIMP is a powerful, open-source image editor that offers many features similar to Photoshop. It is a popular choice for users looking for a free alternative.
- Affinity Photo: Affinity Photo is a professional photo editing software known for its speed and affordability. It is often praised for its robust masking features.
- Corel PHOTO-PAINT: Corel PHOTO-PAINT is part of the Corel DRAW Graphics Suite and offers a range of photo editing and masking tools.
- PaintShop Pro: Paint Shop Pro is known for its user-friendly interface and extensive feature set.
Key Features to Look for in Masking Tools
When selecting masking tools, you must consider some of the tool’s features. These features will help a lot in real editing experiences. Let’s see which key features you should consider:
- Precision and Accuracy: Tools should offer fine control over selections and masks, allowing for detailed and accurate work.
- Non-Destructive Editing: The ability to edit masks without permanently altering the original image is essential. Look for software that supports layer masks and alpha channels for flexibility and the option to adjust anytime.
- Edge Refinement: Advanced tools for refining edges, such as Refine Edge or Select and Mask, help improve the quality of the mask.
- Selection Tools: Effective tools like Quick Selection or Magic Wand can speed up the masking process.
- Layer Management: Robust layer management features are essential for organizing and manipulating multiple layers and masks.
- Alpha Channel Support: Support for alpha channels is essential for handling images with varying levels of transparency. This feature is crucial for creating and managing complex masks involving semi-transparent elements.
- Integration with Other Tools: Compatibility with editing tools and software can enhance your workflow.
Best Practices and Tips for Image Masking
Who doesn’t want the best editing output?
Nobody,
However, you must be strategic while editing a project to achieve this.
Let’s see some best practices for image masking.
- Ensuring Clean Edges
Here are Some Tips for Clean Edges:
- Use the Right Tools:
- Zoom In for Precision:
- Feathering Edges:
- Use High-Quality Brushes:
- Maintaining Image Quality
Here are Some Tips for Maintaining Image Quality:
- Work with High-Resolution Images:
- Avoid Overlapping Layers
- Monitor Color Accuracy
- Keep Original Files Intact
Common Mistakes to Avoid in Image Masking
Ignoring Layer Masks:
Avoid using destructive editing methods that permanently alter the original image. Always use layer masks for non-destructive editing. It allows you to make adjustments and corrections without affecting the original file.
Inconsistent Edge Refinement:
Inconsistent edge refinement can lead to unnatural transitions between the masked subject and the new background. You must consistently refine edges and blend them smoothly to avoid harsh or noticeable lines.
Overusing Feathering:
Feathering can help create smooth transitions. But, overdoing it can lead to blurred or fuzzy edges. Use feathering sparingly and adjust the amount based on the specific needs of the image.
Neglecting Fine Details:
Failing to address fine details, such as hair strands or fabric textures, can result in an unrealistic or incomplete mask. So, you must pay attention to these details to ensure accuracy and completeness.
Not Refining Edges Properly:
Poorly refined edges can make the masked subject appear detached or artificial. Take the time to carefully refine and adjust edges to achieve a natural and seamless look.
Skipping Quality Checks:
Skipping quality checks may produce errors or inconsistent results. To achieve the best outcome, you must check quality before outcomes. You can use Zoom lebel and multiple screens to check quality.
Conclusion
Image masking offers incredible flexibility and precision. However, to fully appreciate and master in it, practice is vital.
Experiment with different tools and techniques to understand their strengths and limitations. Start with simple projects and gradually challenge yourself with more complex images to build your skills and confidence.
The more you practice, the more intuitive masking will become, and you’ll be able to achieve more precise and professional results in your photo editing projects.


