Grainy pictures can be a frustrating issue in photography, especially when you capture a special moment or a beautiful scene. Just imagine you took a picture of your memorable moment, but it becomes the grainy cause of low light or camera settings errors. You cannot capture that scene again. What will you do?
Nothing to worry about this. Whether you are a professional photographer or a newbie, you can enhance the quality of your images by fixing grainy effects in Photoshop. In this blog, we will learn how to fix grainy pictures in Photoshop.
Understanding the problem: What causes grainy pictures?
To effectively fix grainy pictures in Photoshop, it’s essential to understand what causes graininess in the first place. Grain, also known as noise, occurs in digital images when there is a lack of light or when the ISO setting on your camera is set too high.
Low-light conditions can produce grainy pictures as the camera sensor struggles to capture enough light. Additionally, high ISO settings amplify the noise in an image, resulting in a grainy appearance.
Other factors that can contribute to graininess include small image sensor size, long exposure times, and using low-quality lenses.
First, you need to address the root cause of graininess before attempting to fix it. It will help to fix it in easily through photo editing techniques in Photoshop.
Assessing the picture: Is it worth fixing?
Before diving into the various methods and techniques to fix grainy pictures in Photoshop, it’s vital to assess whether the picture is worth fixing in the first place. While Photoshop is the best tool, it can only do so much to salvage a heavily grainy image.
Consider factors such as the importance of the picture, its sentimental value, and the overall quality and composition. If the picture holds significant value or captures a special moment, then it may be worth investing time and effort.
However, if the picture is of low quality or lacks content that is meaningful to you, it may be more practical to let it go and focus on improving your photography skills for future shots.
By making an informed decision on whether to fix the grainy picture or not, you can save valuable time and resources in your post-processing endeavors.
Essential Tools to fix a grainy picture in Photoshop
There are several tools and techniques that you need to familiarize yourself with. These tools can help you to fix the graininess and restore clarity to your pictures.
The first tool you will need is the “Noise Reduction” filter, which can be found under the “Filter” menu in Photoshop. This filter allows you to selectively reduce noise in your image, giving it a smoother appearance.
Another valuable tool is the “Smart Sharpen” filter, which is used to enhance the details and overall sharpness of images. This filter helps counteract the softening effect that noise reduction may have on the image.
Additionally, the “Clone Stamp” tool is used to sample and replace grainy areas with similar textures from other parts.
A step-by-step guide to fix grainy photos in Photoshop
We have discussed above the essential tools for fixing grainy pictures in Photoshop. So, let’s begin the tutorial on how to improve the grainy effect in Photoshop.
Step 1: Open Picture in Photoshop
Launch Photoshop software on your computer. Then open your grainy picture. To open the image, go to “File > Open” and select the picture. Then press ok.
Step 2: Duplicate Main Layer
Before any action, duplicate your primary layer so that you can use it later if needed. To duplicate, select the main layer, right-click on your mouse, and then click the “Duplicate Layer” option. You can also drag the main layer and drop it to the “Create a new layer” icon.
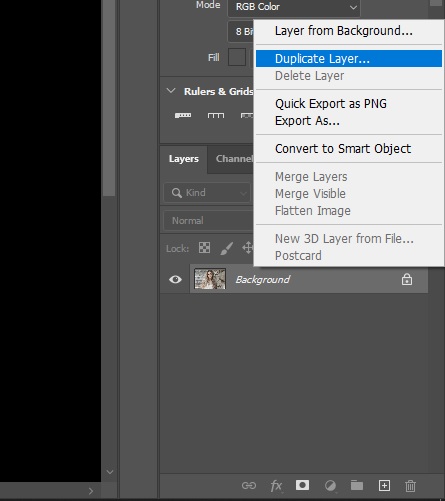
Step 3: Noise Reduction
Select the duplicated layer and navigate to the “Filter” menu. Choose the “Noise Reduction” option to fix the grainy problem. To choose the option to go to “Filter > Noise >Reduce Noise.”
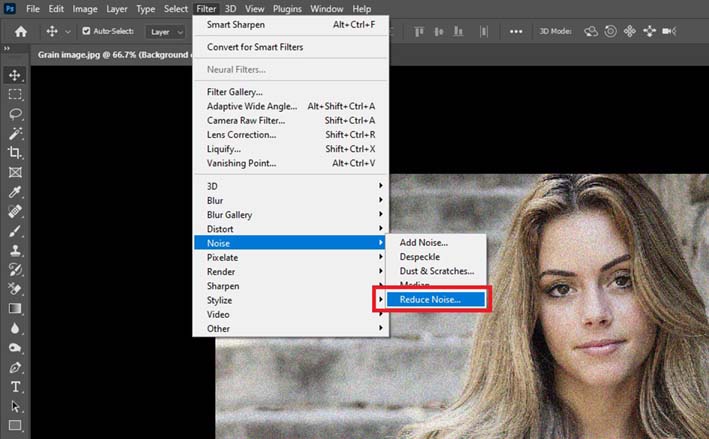
Step 4: Noise Adjustment Levels
Here, you can see a pop-up window with some adjustment settings. In this setting, keep a higher value of “Strength” and “Reduce Color Noise.” Keep the value 0 of the “Preserve Details” and “Sharpen Details” adjustments. For better results, you can adjust the settings depending on your picture’s needs.
Then, Check the “Remove JPEG Artifact” option for better results. Then press “OK“. Keep an eye on the preview window to find the right balance.
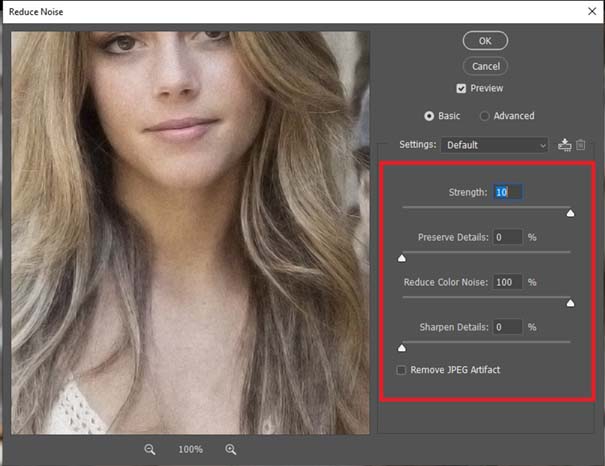
Step 5: Smart Blur
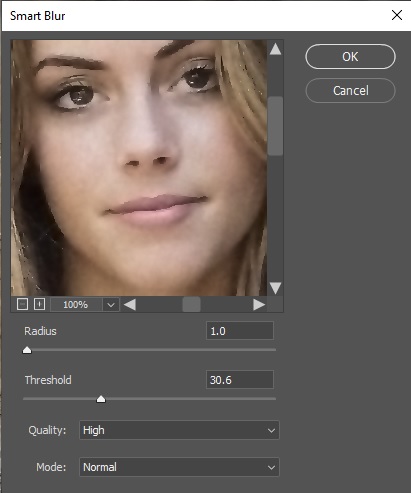
After using noise reduction, if the image looks noisy, use the “smart blur” feature. Go to “Filter > Blur > Smart Blur” to select the feature.
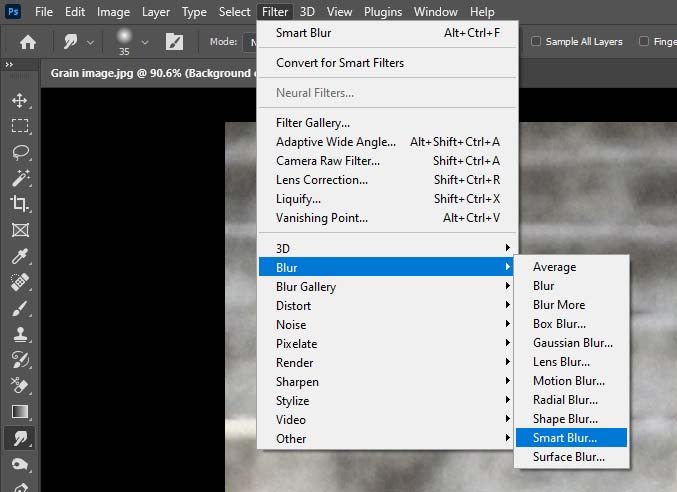
Here, you can see a popup window with some adjustment sliders. Now, set the Radius and Threshold values. Remember, the Radius must be a small number for the best result, like 1 or 2, and the Threshold value depends on the image. For example, we set the Radius to one and the Threshold to 30.6.
Now, experiment with your image.
Step 5: Smart Sharpening of Picture
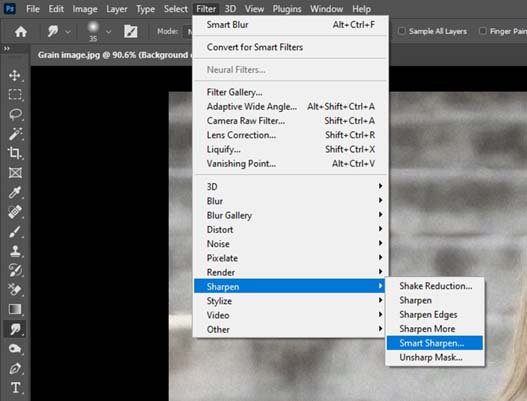
Once you are satisfied with the noise reduction, it’s time to enhance the overall sharpness of your image. Go to the “Filter” menu again, but this time choose “Smart Sharpen.”
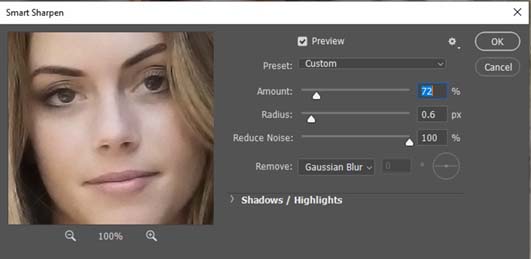
Adjust the sliders to bring back the lost details caused by noise reduction. It’s just a sample value. For the best result, experiment with your picture by adjusting the sliders.
Step 6: Use of Clone Stamp Tool
If there are specific areas that still appear grainy, you can use the “Clone Stamp” tool. Select it from the toolbar, sample an area with a similar texture, and paint over the grainy spots.
Step 7: Adjustments
Finally, examine your image closely and make any necessary adjustments to brightness, contrast, and levels to bring out the best result.
Step 8: Save
After fixing the grainy effect, save your picture. To save the picture, go to “File and its dropdown menu Save /Save As.” Now, select a file format and press “OK” to save.
Now, you can effectively fix grainy pictures in Photoshop and transform them into stunning, high-quality images by following these steps.
Additional techniques for improving picture quality
While the previous basic steps to fix grainy pictures in Photoshop, there are several additional techniques you can use to enhance the quality of your images. These advanced features will help you to take your editing skills to the next level.
Adjusting levels and curves:
By manipulating the levels and curves of your image, you can fine-tune the tonal range and increase the overall contrast. This helps to bring out the details and make your pictures look more vibrant.
Utilizing the Healing Brush tool:
Sometimes, graininess can be accompanied by imperfections such as dust spots or scratches. The Healing Brush tool in Photoshop can help you to seamlessly remove these distractions, resulting in a much cleaner and smoother image.
Applying selective noise reduction:
Instead of applying noise reduction to the entire picture, you can use techniques like masking or adjustment layers to target specific areas that appear grainy. This technique helps for more precise control and avoids the risk of over-smoothing.
Experimenting with blending modes:
Photoshop offers various blending modes that can enhance the details and colors in your image. By experimenting with these modes and adjusting the opacity, you can achieve unique and stunning effects
Conclusion:
You can easily fix the grainy pictures in Photoshop by applying above techniques.
Always try to work non-destructively by using adjustment layers. so you can always go back and make further adjustments if needed.
We also suggest to make some experiment and find the techniques that work best for your specific image.

